
Working with a Mask
Revealing Captivating Designs
Good day, fellow crafters. Today, I am exploring the technique of using masking in my card creation. If you are new to crafting this is a technique you can utilize where specific areas or elements are covered or protected while you apply colors, patterns, or textures to other parts of your project. It involves using masks, typically made of paper, plastic, or in my case an adhesive material from Gina K called Magic Mask, to create crisp edges, preserve desired areas from being covered over, or assist you to layer various elements. Masking allows for precise control and the creation of intricate designs, adding depth, dimension, and visual interest to a wide range of creative projects, not just with cards. With practice, this invaluable technique becomes a valuable asset in your artistic toolkit. Join me on this exciting journey and let's explore the art of masking together. I hope you enjoy.


The creation of this card was a lot of fun; I must admit, I thoroughly enjoyed the entire creative process with this card. The magic of this card happens when introducing the technique of the mask. It instantly elevated the card's visual impact, and the juxtaposed positive and negative space at the center of the card resulted in a captivating focal point that effortlessly grabs your attention. The interplay of these elements adds an intriguing dimension to the overall design, making it truly pop. Even more so when the mask is such a simple element.
From the onset, I knew that I was going to be masking for this project with Gina K Magic Mask, and I knew that when it came to adding color I was going to go with my favorite method to do so, water coloring. What I did not know was that the Magic Mask would do a poor job of adhering to my premium watercolor paper. It just would not stick without leaving bubbles. To overcome this issue, I decided to experiment with premium Hammermill paper, which surprisingly provided the desired adhesion without any bubbling problems. However, since Hammermill paper isn't specifically designed for water coloring, I needed to test it to ensure it could hold my inks adequately. Thankfully, the test piece yielded satisfactory results, giving me the green light to proceed with creating the actual card.

To beign that backround I started with creating the mask, a very simple sentiment of “HELLO” by using the Altenew Might Alphabet Die set and the aforementioned Gina K Magic Mask. Once I had all of the letters cut out I aligned them on my Tonic Studios glass mat using the grids to align them and figure out the spacing I wanted between letters. I then used Mint tape to transfer the letters to my Hammermill paper to carefully adhere them. To get them bubble-free I used the edge of an old credit card as a squeegee to push all the edges down. I think that a credit card or store card works best for this because the edges are rounded and smooth.
Once all the letters were arranged and smoothed out, I used the Altenew Captivating Blooms stamp, image on the right, and some Versa Mark clear embossing ink to stamp my image across the card, including over the stamp. I then covered the embossing ink with an extra fine gold embossing powder and then heat-set it. I chose gold for this step because I love the way it shimmers against the pale water coloring. Embossing serves not only for aesthetics but also acts as a resist for the ink pigments and helps contain the color within the designated areas.
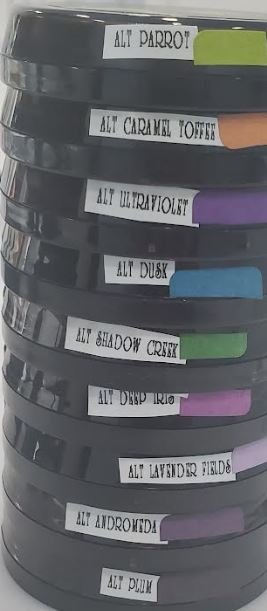
The next step is always my favorite, adding color. Since I had been handling the background and using heat on the paper, I checked that the mask was still securely in place and then set to work. To get my “watercolor” I used the technique I often do which is to stamp a bit of ink directly onto my glass mat and then spritzed it with water. By using my watercolor brush pen I could then pick up the pigment and apply it just like watercolor pigments. This way all the hard work of mixing various hues is already completed for you. The inks I chose to use for this card were all Altenew Crisp Inks, the colors of which you can see listed in the above image. After everything was dry I very carefully painted so as to not overwet the Hammermill paper during the process, I set it aside to allow it to dry. For me, if I have the time to wait, I typically do this step overnight.
The last step in creating the background, once it had dried, was to carefully remove the mask from the card background. Witnessing the design emerge as the mask was gently removed was truly a sight, it added a touch of awe and excitement to the creative process. Maybe in my case just a little anxiety because even though I had tested it, I still wasn’t sure if I was going to suffer any bleed-through. In the end, however, it all worked out and I was left with the product you see here.
To complete this card I trimmed the background to its final dimension as well as metallic gold cardstock for a mat. I really felt this helped to frame the whole image into one cohesive piece. After adhering them together they were then adhered to a pre-cut A2 white card base.
I hoped my explanation of the process relays how simple and easy using a mask can be for you, but if you have any questions be sure to leave them in the comment section below or feel free to email me. Remember Crafting is Happiness!

