


Blank Page Muse Rubber Stamps Inspirational Posts
Kindness Swirl
Good day, fellow crafters. It's Tamara once again, with a new post where I am going to be showcasing my latest card created using Blank Page Muse products!
Kindness is a powerful force that has the ability to uplift, connect, and bring joy to those around us. Just like a simple act of kindness can brighten someone’s day, certain colors can influence our emotions in subtle but profound ways. Soft pastel hues such as blues, pinks, and purples are known for their calming and soothing effects. These gentle shades create a sense of peace and positivity, making them perfect for fostering an environment of warmth and compassion. When combined with acts of kindness, these colors can enhance the mood, leaving a lasting impact on both the giver and the receiver

Background Panel
Use the white card stock, inks and ink blending brushes to blend a light pale pattern
KEY TIP: Lighter pressure is your friend when trying to achieve a light hue
Blend in random spots first then blend the edges together
Using the low tack tape or grip mat, secure the Butterfly Trails stencil to the background panel
KEY TIP: Remember that if using the low tack tape option, remove the tape by slowly pulling at a 45° angle to prevent tearing

Using and applicator, apply the Metallic Gilding Polish over the stencil
Caution should be used with how vigorously the polish is applied so it doesn't get under the stencil
Carefully remove the stencil and tape
Remove background panel from worksurface
Clean the stencil and worksurface
Allow the polish to dry in full
Once dry apply the metallic liquid accent drops and then set aside to dry
Sentiment
Using the watermark ink and the Kindness Changes Everything stamp, align, ink, and stamp the sentiment. Repeat if needed for complete coverage
KEY TIP: A stamping platform works well for this step
Using the Black embossing powder cover the watermark ink
Shake of the excess and heat set with the heat tool
Assembly
Trim 1/8" from all sides of the background panel for the mat revel
Using liquid glue, align and adhere the background panel to the card base
The stamps I used can be found by following the links in the materials list or you can find them with a quick search on www.blankpagemuse.com. Visit our social media sites for more stamping fun!
I Brake For Stamps -https://ibrakeforstamps.com/
The Blank Page Muse- https://blankpagemuse.com/
FB Fan Page- https://www.facebook.com/groups/blankpagemuse/
Instagram Shop- https://www.instagram.com/blankpagemuse/
Instagram Blog- https://www.instagram.com/blankpagemuseblog/
Twitter- https://twitter.com/BlankPageMuse

Remember When…
Good day, fellow crafters. It's Tamara once again, with a new post where I will be showcasing my latest card created using I Brake for Stamps and Blank Page Muse products! Check out the rest of the fantastic artists participating in our blog hop here!
Sugar skulls, or calaveras, are a vibrant and meaningful symbol of Día de los Muertos, a Mexican holiday celebrating the memory of loved ones who have passed. These intricately decorated skulls, often adorned with bright colors, flowers, and patterns, represent the blending of life and death, honoring the beauty of remembering those who came before us. The sentiment "Remember When" echoes this tradition, encouraging us to reflect on cherished moments and memories that keep our loved ones alive in our hearts. Just as sugar skulls preserve the essence of those we miss, "Remember When" invites us to treasure the joy and love shared with them.

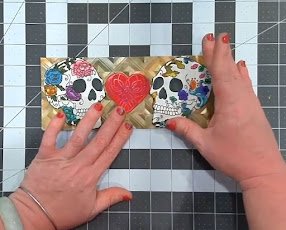
Focal Image

Place and secure white cardstock into the stamping platform
Align, ink, and stamp the focal images and sentiment using black ink
Use Dual-Tip alcohol markers to color the focal images
KEY TIP: Using lighter pressure when applying color and then building up the layers will result in a better-finished result
Allow to dry.
Cut the focal image out with scissors.
Cut the sentiment out with scissors or a label die if available
Center Focal Image
*Optional Method: A heart-shaped hot foil plate, red cardstock, and red foil were used to create the center. This can be substituted using a heart-shaped stencil and ink or red cardstock and a heart-shaped die.
Background Panel
Begin by trimming white cardstock to slimline dimensions using slimline dies and a die-cutting machine. Alternatively, use a paper trimmer or scissors to cut the white cardstock to 3.5" x 8.5".
Assembly


Use white cardstock, colored paste (the color choices are optional), and a blending pad, apply the paste to the card until the desired hue is reached.
Once the desired hue is reached allow the background panel to dry completely. This will prevent the paste from being smeared or removed accidentally in subsequent steps.
Place the panel into the embossing folder
Run the embossing folder through your die-cutting machine based on the manufacturer's recommendations
Repeat if the impression does not transfer cleanly, however, do not remove the panel from the folder before you are satisfied so everything remains aligned
KEY TIP: The panel MUST be dry before this step or it can stick to the embossing folder and rip when removing
Use liquid glue to adhere the background panel to the card base.
Position all elements onto the background panel to confirm the final position.
Use liquid glue to adhere the background panel to the card base.
Apply foam tape or pop dots to the back of the sentiment to add dimensions
Remove the backing from the foam tape
KEY TIP: Add some liquid glue onto the foam tape or before adhering into place. The liquid glue will allow a small opportunity for repositioning before the foam tape adheres to the background panel
Once all elements are in place and adhered to, use a liquid shimmer and a fine-tip brush to add sparkle to the card.
The stamps I used can be found by following the links in the materials list or you can find them with a quick search on www.ibrakeforstamps.com. Visit our social media sites for more stamping fun!
I Brake For Stamps -https://ibrakeforstamps.com/
The Blank Page Muse- https://blankpagemuse.com/
FB Fan Page- https://www.facebook.com/groups/blankpagemuse/
Instagram Shop- https://www.instagram.com/blankpagemuse/
Instagram Blog- https://www.instagram.com/blankpagemuseblog/
Twitter- https://twitter.com/BlankPageMuse
Pinterest- https://www.pinterest.com/blankpagemuse/boards/
Day of the Dead - Foiled Skull
Good day, fellow crafters. It's Tamara once again, with a new post where I will be showcasing my latest card created using I Brake for Stamps and Blank Page Muse products!
The Day of the Dead (Día de los Muertos) is a vibrant Mexican tradition that honors the lives of those who have passed away. Often mistaken for a spooky holiday like Halloween, it is actually a joyous celebration of life and remembrance. The holiday spans two days, with November 1st dedicated to deceased children (Día de los Angelitos) and November 2nd focused on adults. Families build colorful altars, called ofrendas, filled with photos, personal items, and offerings like sugar skulls, candles, and pan de muerto (a special sweet bread), inviting the spirits of their loved ones back for a visit. Marigold flowers, known as cempasúchil, play a central role, as their bright color and scent are believed to guide souls home. The iconic skeleton figure, La Catrina, also represents the equality of all in death, no matter one’s status in life. Recognized by UNESCO as an Intangible Cultural Heritage, the Day of the Dead reflects a deep cultural connection between life, death, and family, emphasizing that death is not an end but part of the human journey.

Focal Image

Dampen the colors to be used in the watercolor pallet with some water and allow it to become saturated with pigment
Using the fine-tip watercolor brush, carefully color the focal image.
Allow to dry completely
KEY TIP: Be sure to keep the brush clean between each color change and do not over-saturate the brush to prevent the colors from running
Boosting the Color

Background Panel

Using a geometric patterned stencil, place it over the dried background panel
Using a complementary colored paste to background panel paste, in this instance gold over blue, blend the paste over the stencil until the desired hue is reached
Carefully remove the stencil and allow the background to dry.
KEY TIP: Always clean your tools after using them as a lot of brands of these pastes are meant to be permeate so they will stain the stencil if left to dry.
Sentiment


Using white cardstock and colored paste, apply and blend the paste to the same hue as the background panel. Allow to dry completely.
Using a stamp platform, align, ink, and stamp the sentiment with watermark ink.
Apply the white embossing powder, remove excess, and then heat set with a heat tool
Assembly
Trim the background panel to 4.25" x 5.5" using a paper trimmer
Use liquid glue to adhere the background panel to the card base
Apply foam tape or pop dots to the back of the focal image to add dimensions
Remove the backing from the foam tape
Repeat for the sentiment
KEY TIP: Add some liquid glue onto the foam tape or before adhering into place. The liquid glue will allow a small opportunity for repositioning before the foam tape adheres to the background panel
To create this project, you will need the following:
Blank Page Muse Butterfly Trails Circles patterns Mixed Media Stencil
Blank Page Muse Kindness Changes Everything words rubber stamp
A2 card base – Lavender (4.25” x 5.5”)
White cardstock
Liquid glue
Paper trimmer
Scissors
Watermark ink
Black embossing powder
Light Pink ink
Light Blue ink
Ink blending brush
Metallic Gilding Polish
Liquid accent drops
Low tack tape or grip mat
Glass or silicon work mat
To create this project, you will need the following:
Blank Page Muse Sugar Skulls by Michelle Frae
Colored Paste (Colors optional)
1 piece of White cardstock
Blending Pads
1 piece of watercolor paper
Scissors
1 A2 White Card Base
Liquid Glue
Black ink - watercolor friendly
Stamping Platform
Watercolor Pallet
Foam Tape
Fine Tip Watercolor Brush
Heat Tool
Qucik Gel Glue Pen
White Embossing Powder
Various Colors of Foil (Brand/Type optional)
Anti-static Pad
Background stencil: Geometric Pattern
Watermark ink

The stamps I used can be found by following the links in the materials list or you can find them with a quick search on www.blankpagemuse.com. Visit our social media sites for more stamping fun!
I Brake For Stamps -https://ibrakeforstamps.com/
The Blank Page Muse- https://blankpagemuse.com/
FB Fan Page- https://www.facebook.com/groups/blankpagemuse/
Instagram Shop- https://www.instagram.com/blankpagemuse/
Instagram Blog- https://www.instagram.com/blankpagemuseblog/
Twitter- https://twitter.com/BlankPageMuse
Fungus Among Us
Good day, fellow crafters. It's Tamara once again, with a new post where I am going to be showcasing my latest card created using I Brake for Stamps and Blank Page Muse products!
Introducing our enchanting mushroom-themed greeting card, a perfect blend of whimsy and nature's charm. Whether you're celebrating a special occasion or simply sending a thoughtful note, this card features beautifully illustrated mushrooms that capture the magic of the forest. Handcrafted with attention to detail, it's an ideal choice for nature lovers and those who appreciate unique, artisanal designs. Elevate your card-giving experience with this one-of-a-kind piece, perfect for birthdays, thank-yous, or just because.

Background panel
Secure a piece of white cardstock to your work surface.
Using blendable blue ink and an ink blending brush, create a blue background panel to your desired hue, then allow it to dry.
Apply watermark ink using the Clouds and Drops stencil, filling in the stencil design.
Remove the stencil and fully cover the watermark ink with White Puffy embossing powder.
Heat set the embossing powder using a heat tool.
Repeat steps for clouds if additional ones are necessary. Allow the panel to cool and set it aside.
Lower Third (Focal Area)
Preheat the laminator.
Secure a piece of white cardstock to your work surface.
Using blendable green ink and an ink blending brush, create a green panel to your desired hue, then allow it to dry.
Secure the Cute Mushrooms stencil over the newly inked cardstock.
Apply foil transfer paste wherever a mushroom is required.
Remove and clean the stencil while the paste dries and becomes clear.
Place metallic red foil over the transfer paste, shiny side up.
Transfer the cardstock and foil to a parchment paper sandwich.
Run the sandwich through the laminator.
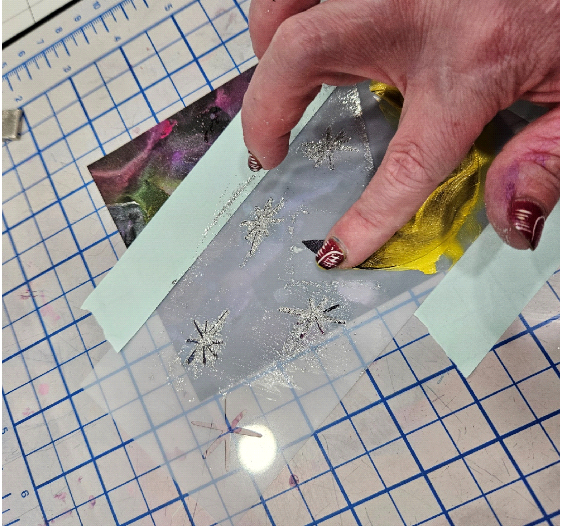
Open the parchment sandwich and carefully pull the foil from the cardstock at a 45-degree angle.
Use scissors to trim a wavy pattern across the panel, creating the horizon line of the card. For a more appealing look, limit this to one-third of the final dimension of the background panel.
Adhere the trimmed panel to the background panel using liquid glue.


To create this project, you will need the following:
Blank Page Muse Butterfly Breezes
Blank Page Muse Cute Mushrooms Stencil
Blank Page Muse Clouds and Drops
Cardstock - white and black
Blendable Inks in Blue, Green, Yellow, and Black
White (Puffy) embossing powder
Watermark ink
Metallic transfer foil - Red
White Laquer Pen
Metallic Gold Pen
Heat Tool
Scissors
Liquid glue
Paper trimmer
A2 card base – white (4.25” x 5.5”)
Ink Blending Brush
Foam tape
Foil transfer gel and applicator
Laminator
Parchment paper

Mushrooms
Use the white lacquer pen to apply randomly positioned and sized dots on the mushroom caps.
Color the stems of the mushrooms with a metallic gold pen. The combination of the red foil and gold pen creates a brownish-gold color that is visually appealing.
Allow everything to dry
Sentiment
Ink-blend a space on white cardstock that is larger than the sentiment from the Butterfly Breezes set.
Allow the inked area to dry.
Place the sentiment stamp on a clear block or in your preferred stamping platform.
Ink the stamp with black ink and stamp the sentiment over the yellow ink. Allow it to dry.
Trim the sentiment to the desired size.
Apply foam tape to the back of the sentiment for added dimension.
Key Tip: Before adhering the sentiment to the background panel, add a small dab of glue to the foam tape. This will provide enough lubrication to make small adjustments to the positioning.
The last stage in the creation process is the assembly. Trim your panel down to 4” x 5.25, which allows for a reveal, and then with liquid glue adhere it to a black mat trimmed to 4.25” x 5.5”. Then adhere the composit to the white A2 card base. With that, I called the card complete.
The stamps I used can be found by following the links in the materials list or you can find them with a quick search on www.blankpagemuse.com. Visit our social media sites for more stamping fun!
I Brake For Stamps -https://ibrakeforstamps.com/
The Blank Page Muse- https://blankpagemuse.com/
FB Fan Page- https://www.facebook.com/groups/blankpagemuse/
Instagram Shop- https://www.instagram.com/blankpagemuse/
Instagram Blog- https://www.instagram.com/blankpagemuseblog/
Twitter- https://twitter.com/BlankPageMuse
Mica Spray
Good day, fellow crafters. It's Tamara once again, with a new post where I am going to be showcasing my latest card created using I Brake for Stamps and Blank Page Muse products!
Incorporating mica sprays with embossed images can create stunning effects. They are a versatile tool that adds a beautiful shimmer and depth to your designs. When applied to embossed images, the sprays highlight the raised areas and enhance the texture, giving your cards a luxurious and dynamic appearance. The result is a captivating blend of color and shine that makes each card unique and eye-catching.


To create this project, you will need the following:
I Brake for Stamps Skellies Set
Embossing folder: Geometric Pattern
2 piece of White cardstock
and 1 piece of Red Cardstock
Colored Paste (Colors optional)
Dual-Tip Alcohol Markers
Blending Pads
1 Slimline White Card Base
Scissors
Black ink
Liquid Glue
Liquid Shimmer
Stamping Platform
Fine Tip Brush
Foam Tape
Hot Foil Plate and Foil
Slimline die


Place the watercolor sheet into the stamping tool and secure
Position and secure the stamp into place
Ink the stamp with black ink
Stamp the image by applying even pressure
Repeat as necessary for a clean image,
Allow the ink to dry
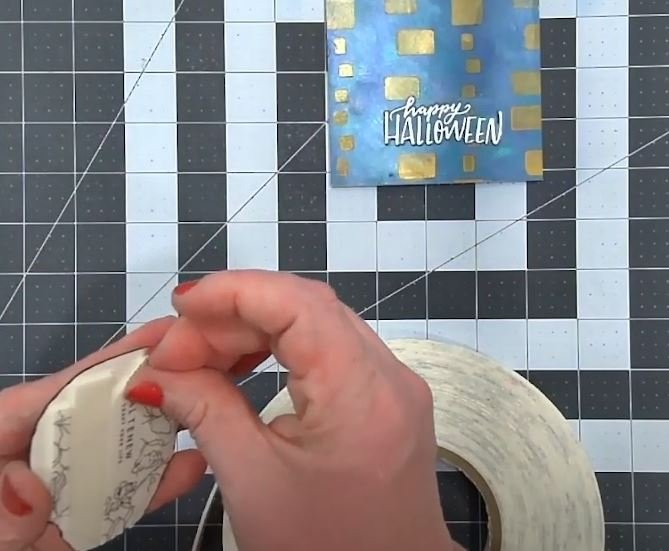
Using the Quick Gel glue pen, apply gel to areas where you will be applying foil following the manufacturer's directions
KEY TIP: Stick to one area and one color at a time so that the foil does not adhere in unwanted locations
Apply the foil gently over the gel and press it lightly. If the gel is ready, then the foil will easily peel from the foil transfer and remain on the gel.
Repeat this step for each of the foil colors to be added.

Moon and Stars
Good day, fellow crafters. It's Tamara once again, with a new post where I will be showcasing my latest card created using I Brake for Stamps and Blank Page Muse products!
Imagine gazing into the night sky, where countless stars shimmer like distant jewels, and the moon casts a gentle glow over the landscape. The vibrant colors of nebulae swirl together in an otherworldly dance, painting the cosmos with hues of deep blues, fiery reds, and brilliant purples. This celestial canvas inspires awe and wonder, reminding us of the infinite possibilities that lie beyond our earthly realm.
To create this project, you will need the following:
Blank Page Muse Celestial Moon & Stars Mixed Media Stencil
Yupo Paper or equvialent
Liquid alcohol inks - black required, other colors at your discreation
Alcohol ink blower
Plastic tarp or splatter box (a MUST)
Shimmer Spray
Silver Glitter Gel
Yellow textured paste
Scissors
Liquid glue
Paper trimmer
A2 card base – white (4.25” x 5.5”)
To craft your card, start by creating the background panel. Since you will be using alcohol inks, which will stain almost anything, take precautions to cover your work surface with a plastic tarp or have a splatter box on hand.

Using a piece of Yupo paper, or equivalent, apply random drops of alcohol ink(s) to the paper surface
Using an air blower, move the inks around until satisfied with the look.
If dissatisfied with the coverage, allow to dry then add more alcohol inks and repeat the process. Drying time allows for a layered look
If satisfied, mist lightly with a shimmer spray
Allow everything to dry completely.
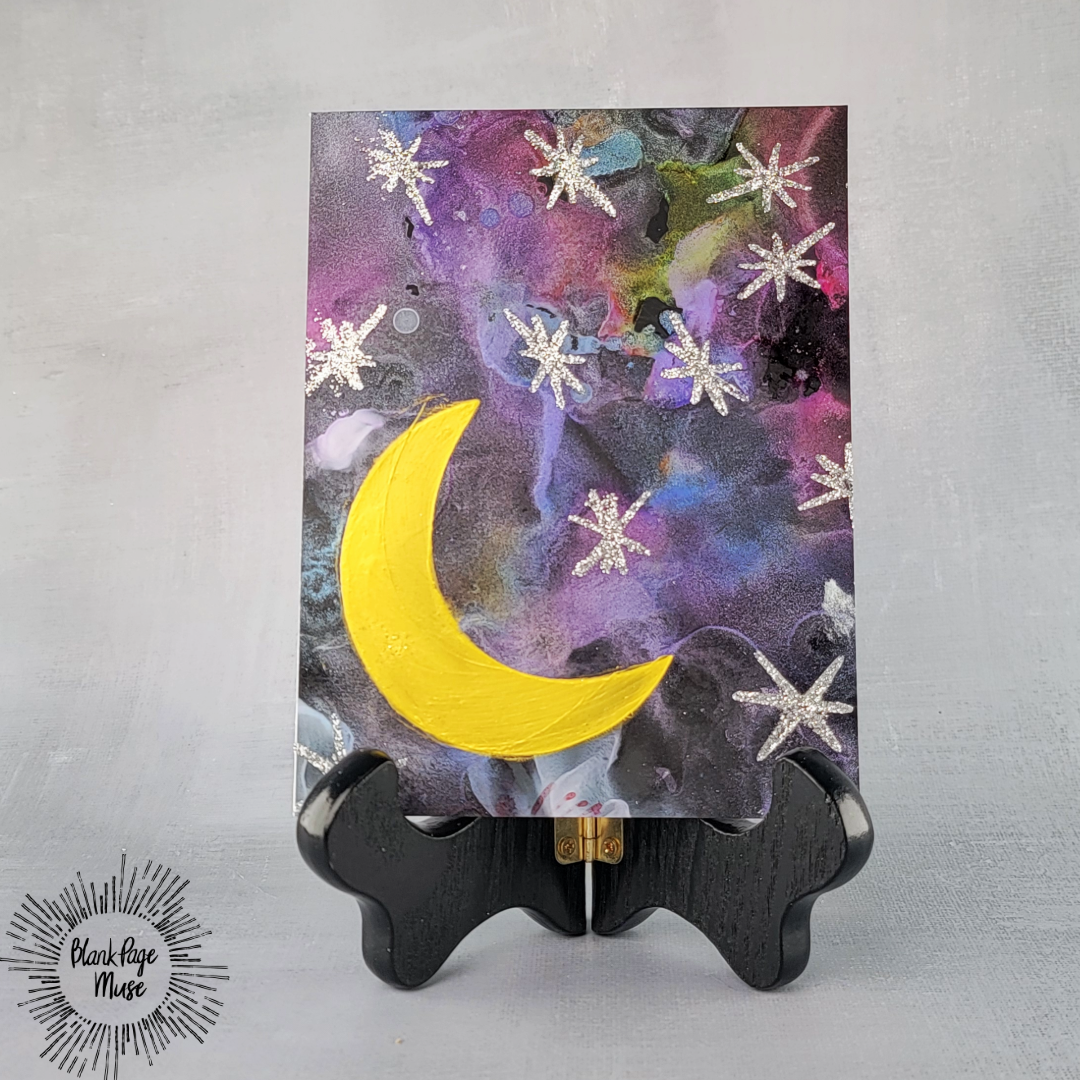
Once everything is dry, the background panel should look something like the image above. Do not worry about your work looking precisely like the example because no two alcohol ink projects will ever be identical which is part of the fun of using them.
The next step of the project is to add our focal image. For this card, you will use the Celestial Moon & Stars Mixed Media Stencil from Blank Page Muse, silver glitter paste, and yellow texture paste.
Using a small pallet knife, spread the silver glitter gel over the stars. Be sure to clean off any excess from the stencil.
Carefully remove the masking from the moon and apply the yellow paste. I opted for finger painting for this step just to amuse myself, but a pallet knife or scrapper works well.
Allow to dry completely and then relocate the stencil as desired to add more stars to the background panel.
KEY TIP: be sure to clean all tools after using gels or pastes to prevent hardening or staining.
Once satisfied with the location of your additional stars allow the background panel to fully dry.


Use white cardstock, colored paste (the color choices are optional), and a blending pad, apply the paste to the card until the desired hue is reached.
Once the desired hue is reached be sure to allow the background panel to dry completely. This will prevent the paste from being smeared or removed accidentally in subsequent steps.
To create this project, you will need the following:
Blank Page Muse You Make Me Happy Hummingbird Clouds Flower
I Brake for Stamps Coral Sunflower (Large)
Cardstock - white
Mica Mists - Olive, Violet, Dark Blue, Peach and Fuchsia
Plastic tarp or splatter box (a MUST)
Stamping platform
Watermark ink
White Embossing powder
Heat Tool
Scissors
Liquid glue
Paper trimmer
A2 card base – white (4.25” x 5.5”)
To craft your card, you will need to begin with the focal image and sentiment.
Place white cardstock into the stamping platform
Align the stamp, and ink with watermark ink, and stamp the focal image. Repeat to ensure complete coverage
Align the stamp, and ink with watermark ink, and stamp the sentiment. Repeat to ensure complete coverage.
Remove the background panel from the stamping platform
Cover the panel liberally with white embossing powder
Heat set the powder with a heat tool.
Place the embossed panel on top of paper towel, a tarp, or in a splatter box
Using various colors of mica sprays, lightly mist over the design.
Apply enough spray to cover completely. The embossing powder acts as a resist so don’t worry about the image
Allow to dry completely
Wipe excess from the embossed area which will brighten the image.
The last stage in the creation process is the assembly. Trim your panel down to 4” x 5.25, which allows for a reveal, and then with liquid glue adhere it to the white A2 card base. With that, I called the card complete.
The stamps I used can be found by following the links in the materials list or you can find them with a quick search on www.blankpagemuse.com. Visit our social media sites for more stamping fun!
I Brake For Stamps -https://ibrakeforstamps.com/
The Blank Page Muse- https://blankpagemuse.com/
FB Fan Page- https://www.facebook.com/groups/blankpagemuse/
Instagram Shop- https://www.instagram.com/blankpagemuse/
Instagram Blog- https://www.instagram.com/blankpagemuseblog/
Twitter- https://twitter.com/BlankPageMuse
Pinterest- https://www.pinterest.com/blankpagemuse/boards/
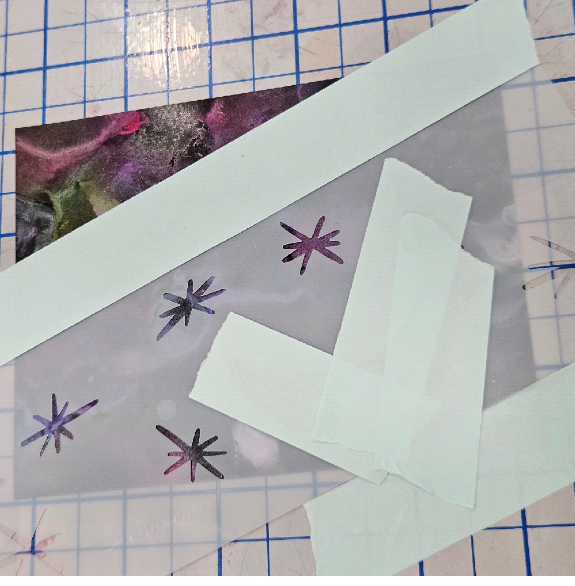
Position the stencil where best fits based on your panel. For this version, I imagined that the left side of the panel was a distant nebula and so wanted to keep that uncovered.
Secure the stencil to your worksurface making sure that you Do NOT use a high tack tape over the background panel itself in order to prevent the paper from ripping when removing the stencil
Once satisfied with the location of the stencil, mask off the moon. The yellow paste being used in a later step will cover any issues resulting from tape removal
The last stage in the creation process is the assembly. Trim your panel down to an A2 size, 4.25” x 5.5”, and with liquid glue adhere it to the white A2 card base. With that, I called the card complete.
The stamps I used can be found by following the links in the materials list or you can find them with a quick search on www.blankpagemuse.com. Visit our social media sites for more stamping fun!
I Brake For Stamps -https://ibrakeforstamps.com/
The Blank Page Muse- https://blankpagemuse.com/
FB Fan Page- https://www.facebook.com/groups/blankpagemuse/
Instagram Shop- https://www.instagram.com/blankpagemuse/
Instagram Blog- https://www.instagram.com/blankpagemuseblog/
Twitter- https://twitter.com/BlankPageMuse
Hummingbirds
Good day, fellow crafters. It's Tamara once again, with a new post where I am going be showcasing my latest card created using I Brake for Stamps and Blank Page Muse products!
Hummingbirds, known for their vibrant colors and remarkable agility, symbolize joy, healing, and resilience in many cultures. Their ability to hover and move in unique ways, combined with their role as essential pollinators, makes them a captivating subject. The combination of a hummingbird and a flower creates a visually stunning and meaningful image, perfect for occasions that celebrate love, gratitude, or encouragement.

To craft your card, start by creating the background panel. Using your choice of stamping platform begin with the flower stamp from the You Make Me Happy set and position it on the left side of the white cardstock. Once satisfied with the position and the stamp is secured to the platform, ink the stamp with black ink and stamp the image. Repeat this step if required to ensure coverage.
The next step is to use ink blending brushes and your choice of inks to create the soft blue sky and to color the flower. I choose to use Distress Oxide for this card if you wish to recreate the same look.
To create this project, you will need the following:
· Blank Page Muse You Make Me Happy Hummingbird Clouds Flower set
· Black ink pad
· Watermark ink
· Cardstock - white
· Cardstock – black
· Distress Oxides or similar
· Vellum
· Scissors
· Alcohol Markers
· Blending brushes
· Liquid glue
· Paper trimmer
· Anti-static powder
· Stamping platform
· Black embossing powder
· Heat Tool
· A2 card base – purple (4.25” x 5.5”)
The next thing to create is the Hummingbird. Using your choice of stamping platforms secure the stamp into position over the sheet of vellum. Next, with watermark ink, ink the stamp up and stamp the image on the vellum. Repeat this step if required to ensure coverage. Once satisfied, thoroughly cover the inked image with black embossing powder, remove the excess, and then set with a heat tool. KEY TIP: Do this slowly while applying the heat to both sides of the vellum to prevent curling. Allow it to cool completely.
Once cool, flip the vellum sheet to the side opposite from the embossing and then color in the pattern on the Hummingbird using alcohol markers. Use a light touch with light colors and go over the places you want to darken with the same color after it has dried as the markers will dry much lighter than the wet color presents itself. Once completed and dry, use scissors to cut the Hummingbird out. You should do this on the outside of, but right against, the outermost profile of the Hummingbird.
The next stage is assembly and finishing. Once the Hummingbird has been cut out you will need to adhere it into place on your background panel. To do this use liquid glue. KEY TIP: To prevent bubbling, DO NOT apply your liquid glue directly to the vellum. Instead put some liquid glue on to a washable surface and use some sort of applicator to apply in a pouncing method until the image is completely covered.
Once the focal image is adhered, use the included sentiment stamp, some black ink, and your preferred stamping platform to stamp the sentiment into place. Lastly, trim your background panel and black mat down to their final dimensions, adhere them together and then adhere the composite to the card base to complete the card.
The stamps I used can be found by following the links in the materials list or you can find them with a quick search on www.blankpagemuse.com. Visit our social media sites for more stamping fun!
I Brake For Stamps -https://ibrakeforstamps.com/
The Blank Page Muse- https://blankpagemuse.com/
FB Fan Page- https://www.facebook.com/groups/blankpagemuse/
Instagram Shop- https://www.instagram.com/blankpagemuse/
Instagram Blog- https://www.instagram.com/blankpagemuseblog/
Twitter- https://twitter.com/BlankPageMuse
Beyond the Border
Good day, fellow crafters. It's Tamara once again, with a new post where I am going be showcasing my latest card created using I Brake for Stamps and Blank Page Muse products!
Today’s project is intended to show you another way to use border stamps other than for just borders or textures. This is a really simple card to make but the end result still speaks volumes.

To craft your card, you will need to begin with a piece of white cardstock, the Beyond the Border stamp set, a stamping platform, and a watermark ink pad. Using the stamping platform, secure the cardstock into place so it does not move. Then you need to align the border stamp across the cardstock horizontally before adhering it to the stamping platform. Using the watermark ink pad, liberally apply the ink to the stamp and then stamp the image onto the cardstock being sure to use an even pressure across the entirety of the stamp. My personal preference is to repeat this step a couple of times to ensure I thoroughly transferred the image. Next reposition the stamp horizontally again and repeat the entire process as many times as you like for your card. I chose five because it is an odd number (visual interest) and the human eye picks up on that distinction much better than when it is an even number (symmetry). If you are worried that your ink may dry to quickly you can move to the next step or as mentioned stamp the rest of the images first.
The next stage is the addition of the white embossing powder to the newly watermarked images. While placing your stamped cardstock over a plate or another piece of cardstock, thoroughly coat the stamped images in embossing powder and then dump off the excess. Be sure to give the cardstock a good flick to remove any excess powder. Once satisfied use the heat tool to set the embossing powder. Once that is done for all of the border stamps, use the same method as described above but with the You Make Me Happy sentiment stamp and black embossing powder.
Following the stamping and embossing of the images comes the addition of the color to the background panel. For this project I used the left-over colors that were still on my ink blending brushes, something I do often to maximize my supplies, however the basic hues to use are pink and purple. Using your ink blending brushes, blend small amounts of each color onto the panel, working from the outside in until satisfied with the final hue. Take your time with this step so that you can blend the colors together and not have streaks or uneven coverage. Once the ink is dry use a microfiber towel to wipe the excess ink from the embossed images.
Beginning with a matching dimension to the A2 card in mind, it is time to trim down the mats and the background panel to their final dimensions. As this look is subjective to the one creating it, the actual dimension could vary wildly. As a rule of thumb, removing 1/8” from all sides is a good look for layered mats. To replicate this look, you would need to remove 1/8” on the bottom (White) mat from all sides, then 1/4" from all sides for the next (Black) mat and then finally 1/8” on all sides for the background panel which comes to 3.25” wide x 5” long in the end. Once trimmed down to final size adhere each layer together with liquid glue ensuring the spacing is correct and everything is straight. To finalize the card, adhere an odd number of the iridescent flat black pearls to random locations on the background panel to add dimension.
The stamps I used can be found by following the links in the materials list or you can find them with a quick search on www.blankpagemuse.com. Visit our social media sites for more stamping fun!
I Brake For Stamps -https://ibrakeforstamps.com/
The Blank Page Muse- https://blankpagemuse.com/
FB Fan Page- https://www.facebook.com/groups/blankpagemuse/
Instagram Shop- https://www.instagram.com/blankpagemuse/
Instagram Blog- https://www.instagram.com/blankpagemuseblog/
Twitter- https://twitter.com/BlankPageMuse
Pinterest- https://www.pinterest.com/blankpagemuse/boards/
Happiness Blooms from Within
Good day, fellow crafters. It's Tamara once again, with a new post where I am going be showcasing my latest card created using I Brake for Stamps and Blank Page Muse products!
Happiness blooms from within, much like a flower nurtured by the rich soil of self-awareness and personal growth. It isn't something that can be simply acquired or bestowed by external circumstances; rather, it flourishes from our inner resilience, positive mindset, and the choices we make every day. Just as a gardener tends to their plants with care and attention, we must cultivate our inner garden through practices such as gratitude, mindfulness, and self-compassion. In my card designs, I embrace this theme of inner happiness. Each handmade card is crafted to inspire joy, reflection, and connection, encouraging us to nurture and celebrate the happiness that comes from within. By sharing these cards, we spread the message that true joy is cultivated internally and blossoms outward, touching the lives of others.

To craft your card, start by creating the background panel, as this is the most time-consuming portion. First, mix the Cherry Kool-Aid per the package instructions, minus the sugar, in a tub or tray. Once it's fully incorporated, place a sheet of watercolor paper into the prepared liquid. Allow the paper to set for a full 24 hours to absorb the color, then let it dry completely. You can use a heat gun to speed up the process, but the color doesn't look as nice in the final product.
Next, stamp your focal images. Using black ink and the Floral Spray Sunflowers Chrysanthemum Line Art stamp, ink and then stamp the image on the area of the watercolor paper where the color looks the most pleasing to your eye. Allow the ink to dry.
Now it's time to add color. For this project, watercolors are suggested, but you can also use quality-colored pencils or alcohol markers if you prefer. The best technique with watercolors is to wet small areas of the image at a time with water, then drop small amounts of watercolor pigments into the wet area. Slowly brush the pigment into the desired areas. If the color is too heavy, use a paper towel to dab up the excess. This technique allows you to slowly build up color and results in a better finish. Once you're done, let the paper dry completely.
Stick With Me!
Good day, fellow crafters. It's Tamara once again, with a new post where I am going be showcasing my latest card created using I Brake for Stamps and Blank Page Muse products!
Life can sometimes feel like a desert cactus, with its twists and unexpected turns. Just as a cactus thrives in harsh conditions, we too can endure and grow through life's challenges. Our mental health may waver, feeling off-kilter or crooked, but it's during these times that support becomes essential. The sentiment "Stick with Me" echoes the resilience of the cactus, reminding us that companionship and perseverance can help us weather any storm. Just as the cactus stands tall despite adversity, we too can find strength in sticking together and supporting one another through life's unpredictable journey.

Kindness Changes Everything
Good day, fellow crafters. It’s Tamara once again, with a new post where I am going be showcasing my latest card created using I Brake for Stamps and Blank Page Muse products!
Koi fish are renowned for their vibrant colors and graceful movements, making them symbols of beauty and serenity in many cultures. Their scales display a dazzling array of colors, from shimmering golds and fiery reds to cool blues and tranquil whites, each with intricate patterns that captivate the eye. Incorporating a koi fish stamp into a greeting card layout brings this natural elegance to your design. The koi's flowing lines and dynamic shapes create a sense of movement and tranquility, making the card both visually stunning and emotionally soothing. Whether you use vivid inks to replicate the koi’s natural splendor or more subdued tones for a minimalist effect, a koi fish stamp transforms any card into a work of art that conveys grace and harmony.

To create this project, you will need the following:
Stamps
• Blank Page Muse Floral Spray Sunflowers Chrysanthemum Line Art – Pam Bray Designs
• Blank Page Muse Happiness Blooms from Within words – Shaloo Webster
• Black ink pad
• Watermark ink
• Cardstock – black
• Watercolor paper
• A2 card base – white (4.25” x 5.5”)
• Watercolor pigment
• Liquid glue
• Paint brushes
• Paper trimmer
• Heat Tool
• Stamping platform
• Die-cutting machine
• Tub large enough to fit watercolor paper
• Anti-static powder pad
• Label Die
• Cherry Kool-Aid – sugar free
• Water – amount per Kool-Aid directions
• Cup of water for cleaning paint brushes
• White Embossing powder
Next, cut the background panel and the cover mat to size. Using a paper trimmer, first trim your water-colored background panel to its final dimensions. For this design, the dimensions are smaller than the A2 card base to provide some visual interest. Then, trim the black cardstock to 4.25” x 5.5” to cover the front of the card base. Set these aside.
Now it’s time to create the sentiment. Start with the black cardstock, using either any extra pieces that were trimmed off in the previous step or, as is often done in my studio, the center of the cover mat since it will be covered in the assembly stage. Place your black cardstock in your stamping platform of choice. Align the "Happiness Blooms from Within" words stamp over the area of the card you wish to stamp. Lightly dab the area with an anti-static powder pad where the stamp will land. Using a watermark ink pad, tap the ink pad onto the stamp to get an even coat. Once inked, stamp the image onto the cardstock. Repeat one or two times to ensure a proper image transfer. Cover the freshly stamped image with white embossing powder, then dump off the excess. Heat set this with a heat tool until melted. Lastly, using a label die that fits around the sentiment and a die-cutting machine, cut out the sentiment.
For the final step, assemble your card. Using liquid glue, adhere the black cardstock to the card base. Next, align and adhere the background panel with more glue. Lastly, position the sentiment in the desired location and adhere it to the background panel with liquid glue. As an optional idea, you can use pop-dots or foam tape for the sentiment. With that, your card is complete.
The stamps I used can be found by following the links in the materials list or you can find them with a quick search on www.blankpagemuse.com. Visit our social media sites for more stamping fun!
I Brake For Stamps -https://ibrakeforstamps.com/
The Blank Page Muse- https://blankpagemuse.com/
FB Fan Page- https://www.facebook.com/groups/blankpagemuse/
Instagram Shop- https://www.instagram.com/blankpagemuse/
Instagram Blog- https://www.instagram.com/blankpagemuseblog/
Twitter- https://twitter.com/BlankPageMuse
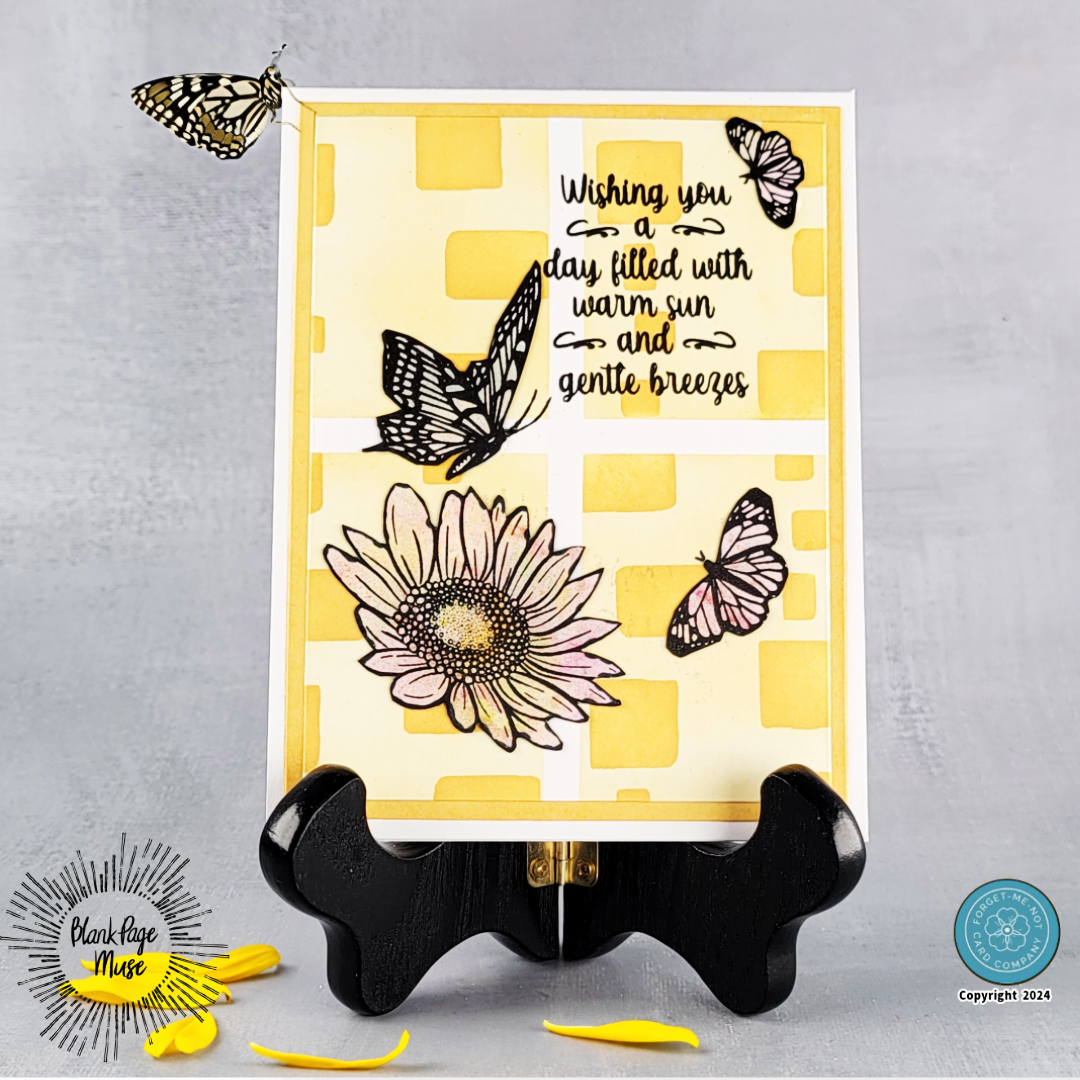
Warm Sun and Gentle Breezes
Good day, fellow crafters. It's Tamara once again, with a new post where I am going be showcasing my latest card created using Blank Page Muse products!
As soon as I saw the sets I'm showcasing today, I thought of someone special who loves sunflowers, butterflies, and the color yellow. I ordered them right away and added them to my craft stash. This card is beautiful yet simple to make, so let's get started.
To create this project, you will need the following:
Blank Page Muse Beyond the Border Mixed Media Set 2 – Pam Bray
Blank Page Muse You Make Me Happy
Black embossing powder
White embossing powder
Pink ink pad – hue of your choice
Purple ink pad – hue of your choice
Watermark ink pad
Cardstock – black
Cardstock - White
Liquid glue
Paper trimmer
A2 card base – Lavender (4.25” x 5.5”)
Iridescent flat-back pearls
Heat tool
Stamping platform – Misti or equivalent
Ink-blending brushes
Microfiber towel
To create this project, you will need the following:
Blank Page Muse Southwestern Desert Cactus Flowers and Skull Scene – Pam Bray Designs
Blank Page Muse Stick with me Words Art - Pam Bray Designs
Black ink pad
Cardstock – black
Liquid glue
Paper trimmer
Coffee
Tub large enough to fit watercolor paper
Watercolor paper
Watercolor pigments
Paint brushes
Cup of water for cleaning paint brushes
A2 card base – white (4.25” x 5.5”)
To craft your card, start by creating the background panel as this is the most time-consuming portion. First, brew the coffee per the package instructions and allow it to cool. Next, pour the coffee into the tub and place a sheet of watercolor paper into the prepared liquid. Allow the paper to rest for a full 24 hours to absorb the color and then allow it to dry fully naturally. A heat gun can be used to speed up the process, but the color doesn’t seem to look as nice in the final product.
The next stage is to stamp your focal images. Using black ink and the Southwestern Desert Cactus Flower and Skull Scene stamp, ink and then stamp the image in the location of the watercolor paper where the color looks the most pleasing to your eye. Allow the ink to dry.
Following the stamping of the images comes the addition of the color. For this project watercolors are suggested, however other media such as a quality-colored pencil or an alcohol marker may be to your liking. The best technique to employ with the water coloring pigments is to wet small areas of the image at a time with water, and then drop small amounts of watercolor pigments into the wet area. Then slowly brush the pigment into the areas where color is wanted. If the color is too heavy, use a paper towel to dab up the excess. This technique allows you to slowly build up color and results in a better finish. Once the color addition is complete allow the paper to dry completely.
For the next step you need to cut your paper to size. Using a paper trimmer, first trim your water-colored background panel to its final dimensions. I have purposely made the dimensions smaller than the A2 card base to provide some visual interest. Next trim the black cardstock to 4.25” x 5.5”, this is to cover the front of the card base.
The next stage is assembly. Using liquid glue, adhere the black card stock to the card base. Next, adhere the background panel with more glue. As part of the design theme the background panel is angled purposefully.
Lastly, using black ink and the Stick with me Words Art, ink and stamp the sentiment onto the card. Again, for the theme of the card this was done a slight angle. With that, your card is complete.
If you or someone you know is suffering from issues related to mental health and needs help, then call the National Mental Health Hotline 24 hours a day at 1-866-903-3787. It is free and confidential.
The stamps I used can be found by following the links in the materials list or you can find them with a quick search on www.blankpagemuse.com. Visit our social media sites for more stamping fun!
I Brake For Stamps -https://ibrakeforstamps.com/
The Blank Page Muse- https://blankpagemuse.com/
FB Fan Page- https://www.facebook.com/groups/blankpagemuse/
Instagram Shop- https://www.instagram.com/blankpagemuse/
Instagram Blog- https://www.instagram.com/blankpagemuseblog/
Twitter- https://twitter.com/BlankPageMuse
To create this project, you will need the following:
I Brake for Stamps Koi Fish
Blank Page Muse Kindness Changes Everything words stamp
Black ink pad
Cardstock – black
Card base - white
liquid glue
paper trimmer
watercolor paper
Blue Raspberry kool-aid
Watercolor pigments
Liquid glue
Paper trimmer
Tub or tray for the kool-aid
Paint brushes
Cup of water for cleaning paint brushes
To craft your card, start by creating the background panel as this is the most time-consuming portion. First, mix the Blue Raspberry Kool-Aid per the package instructions minus the sugar in a tub or tray. Once incorporated fully, place a sheet of watercolor paper into the prepared liquid. Allow the paper to set for a full 24 hours to absorb the color and then allow it to dry fully naturally. A heat gun can be used to speed up the process but the color doesn’t seem to look as nice in the final product.
The next stage is to stamp your focal images. With black ink and using random placements, stamp multiple images of the Koi fish onto the background panel. The placements can even be offset if you wish as done in my card. The number of fish stamped is also totally up to your imagination. Following the stamping of the images comes the addition of the color. For this project watercolors are suggested, however other media such as a quality colored pencil or an alcohol marker may be to your liking. The best technique to employ with the water coloring pigments is to wet small areas of the image at a time with water, and then drop small amounts of watercolor pigments into the wet area. Then slowly brush the pigment into the areas where color is wanted. If the color is to heavy, use a paper towel to dab up the excess. This technique allows you to slowly build up color and results in a better finish. Once the color addition is complete allow the paper to dry completely.
The next stage is assembly. Using a paper trimmer, trim your background panel to its final dimensions and then with slightly larger dimensions cut the black cardstock down for a mat. In the example, I chose to have those dimensions be large enough to cover the entirety of the front of my A2 card base. Next, using liquid glue, adhere the background panel and the mat together and then with more glue adhere the composite to the white card base.
Lastly, using black ink and the Kindness Changes Everything word stamp, ink and stamp the sentiment onto the card. With that, your card is complete.
The stamps I used can be found by following the links in the materials list or you can find them with a quick search on www.blankpagemuse.com. Visit our social media sites for more stamping fun!
I Brake For Stamps -https://ibrakeforstamps.com/
The Blank Page Muse- https://blankpagemuse.com/
FB Fan Page- https://www.facebook.com/groups/blankpagemuse/
Instagram Shop- https://www.instagram.com/blankpagemuse/
Instagram Blog- https://www.instagram.com/blankpagemuseblog/
Twitter- https://twitter.com/BlankPageMuse
stamp the images onto the panel in the colored area of your choice. You can either let the natural color of the background panel stand out or add additional coloring to the images. Once stamped, or stamped and colored, fussy cut the stamped images and set them aside for later.
For the background panel, you will need a piece of white cardstock, the Blank Page Muse Blocks Pattern Stencil, and some masking tape. Because the stencil is smaller than an A2 card, masking is necessary. First, secure the white cardstock to your work surface and then secure the stencil in place. Mask off the area where you don’t want ink, and use yellow ink and an ink blending brush to apply the color. Once completed, remove the stencil, realign it on the opposite side of the panel, secure it, mask, and ink blend this side of the panel. Allow it to dry fully.
The last stage is to assemble the card. Using a paper trimmer, cut the inked background panel to its final dimensions. Trim a piece of yellow cardstock slightly larger than the finished background panel to create a mat. Once both sheets are to size, use liquid glue to adhere the background panel to the mat, then adhere the composite to a white card base. Once dry, orient and adhere your sunflower and butterflies to the panel. Finally, using the sentiment from the Butterfly Breezes stamp set and black ink, orient and stamp the sentiment. With that, your card is complete.
The stamps I used can be found by following the links in the materials list or you can find them with a quick search on www.blankpagemuse.com. Visit our social media sites for more stamping fun!
I Brake For Stamps -https://ibrakeforstamps.com/
The Blank Page Muse- https://blankpagemuse.com/
FB Fan Page- https://www.facebook.com/groups/blankpagemuse/
Instagram Shop- https://www.instagram.com/blankpagemuse/
Instagram Blog- https://www.instagram.com/blankpagemuseblog/
Twitter- https://twitter.com/BlankPageMuse
May The Dragons Be With You
Good day, fellow crafters. Today, I'm excited to be showcasing my latest card! Dragons have always intrigued me due to their representation of strength, wisdom, and fortune in many cultures. Particularly in Eastern mythology, they are viewed as protective figures, offering guidance and safety to humans. This card celebrates these powerful creatures, highlighting their significance and the respect they garner across cultures. Join me in discovering the symbolism and artistic portrayal of dragons in my latest design.

You will need the following:
· Blank Page Muse Butterfly Breezes
· Blank Page Muse Block Pattern Stencil
· Black ink pad
· Yellow ink pad
· Cardstock – white and yellow
· liquid glue
· masking
· paper trimmer
To craft your card, start by selecting a background panel. You can use one you’ve previously created or make a new one based on your preference. For this project, the chosen panel features light pink and various shades of yellow. This panel will serve as the basis for your stamped images, so choose colors that appeal to you.
Next, use black ink and the Butterfly Breezes stamps to
foundation for each card you create. This particular piece was a really good fit for a “golden” dragon, so it was exciting to use it. The next step is to employ the Little Draco stamp by Carmen Medlin Designs. Apply black pigment ink to the stamp and press it onto your background panel. At this stage, you can decide to either let the natural color of the background panel stand out or choose to add any additional coloring to the image. In this case, by not adding additional color this allows the intricate details of the stamp to integrate seamlessly with the vibrant hues of the background.
With black ink and the sentiment stamp from the You Make Me Happy stamp set, add your sentiment next. Lastly, trim the background panel to its final dimensions as well as a black mat for added visual appeal. Then use liquid glue to adhere the background panel to the mat and repeat the process to adhere the composite to a white card base. With that, you can call the card complete.
The stamps I used can be found by following the links in the materials list or you can find them with a quick search on www.blankpagemuse.com. Visit our social media sites for more stamping fun!
I Brake For Stamps -https://ibrakeforstamps.com/
The Blank Page Muse- https://blankpagemuse.com/
FB Fan Page- https://www.facebook.com/groups/blankpagemuse/
Instagram Shop- https://www.instagram.com/blankpagemuse/
Instagram Blog- https://www.instagram.com/blankpagemuseblog/
Twitter- https://twitter.com/BlankPageMuse
A little Asian Flair
Good day, fellow crafters. It's me, Tamara, and today, I'm excited to unveil a captivating new design on the Blank Page Muse blog, inspired by my deep appreciation for the Far East and its vibrant cultural traditions. This project reflects the colorful ceremonies and rich history that have always intrigued me. Dive into this artistic exploration and discover how Eastern aesthetics can enrich your crafting. Don’t miss out—visit the Blank Page Muse blog and let your creativity take flight with this unique design!

To get started, you will need the following:
I Brake for Stamps Little Draco
Blank Page Muse You Make Me Happy
Background panel of your choice
Black ink pad
Cardstock
liquid glue
To craft your card, start by selecting a previously created background panel or a freshly created one depending on your preference. In crafting, prioritizing efficiency and resourcefulness by utilizing any leftover inks, paints, or watercolors is key. Make good use of any leftovers as "dips" for white cardstock, allowing the paper to soak up the remaining pigments. Using a piece of acetate as your artist's palette, simplifies the process, though a glass mat works just as well. This approach not only saves time, money, and materials but also provides a unique
To get started, you will need the following:
Blank Page Muse Japanese Characters Background
Blank Page Muse Geisha Collage
High quality watercolor paper
Coffee
Black, brown and red ink pads
Clear embossing powder
Masking tape
Watercolor pigments
Cardstock
liquid glue
Begin by immersing the watercolor paper in coffee for a full twenty-four hours to achieve a deeply weathered and aged appearance. As the paper dries, it adopts the warm, sepia-toned hues and slightly textured surface reminiscent of vintage posters you might find tucked
away in an antique shop. This intentional aging process gave the paper a beautifully distressed look that perfectly complements the historical theme of my design.
Following the aging process of the paper, move on to create the background. I used the Japanese Characters Background stamp with brown ink to introduce an element of subtle depth and texture. To ensure the characters appeared subtly, first ink the stamp and press onto a scrap piece of paper—a technique known as 'stamping off. ' This step removes excess ink so that when it is stamped onto the background panel, the characters will be faint and contribute to the card's aged appearance.
This method was effective in giving the design a more authentic, worn look, as if the characters had been part of the paper for decades.
The next step in creating the background panel was the addition of the Geisha Collage stamp. To begin, mask off the large character on the left side of the stamp with some masking tape to keep it ink-free. Then apply black ink to the remaining parts of the stamp. After removing the masking tape, I inked the previously covered character in red before applying the entire stamp on my background panel.
Next, while the stamped image is still wet, sprinkle clear embossing powder over the ink and heat set it in preparation for the next step which was to water color the image.
(I personally like to add this step when I use watercolor pigments because the melted embossing powder provides a bit of a well to apply your pigments too which assists in reducing bleed through of colors.) Once the embossing is set, secure the panel to your work surface and water colored the image.
While the image dries, choose some cardstock colors that fit together with your theme, in this case red and black, them trim them to their final dimensions to act as mats for the background panel. Then adhere them together with the image onto a white card base.
The stamps I used can be found by following the links in the materials list or you can find them with a quick search on www.blankpagemuse.com. Visit our social media sites for more stamping fun!
I Brake For Stamps -https://ibrakeforstamps.com/
The Blank Page Muse- https://blankpagemuse.com/
FB Fan Page- https://www.facebook.com/groups/blankpagemuse/
Instagram Shop- https://www.instagram.com/blankpagemuse/
Instagram Blog- https://www.instagram.com/blankpagemuseblog/
Twitter- https://twitter.com/BlankPageMuse